My parents 50th anniversary is June 18. Last year was my in-laws anniversary and we had a nice catered party with a 4 tiered cake that I worked my backside off preparing. My family on the other hand is small. Even with all the cousins we only number about 14 people and my parents don't get out and don't have any friends. I've asked my parents several times what they wanted to do for their 50th and they always say "nothing" so I haven't really planned anything.
My grandmother on the other hand is a different matter. She knows my parents want nothing for their anniversary but she doesn't believe that includes having cake and ice cream. And it got me thinking...
There's been a cake decorating technique I've wanted to try and it seems like a good opportunity to try it out and there's a cake recipe that I found that I think my parents will really like. So I thought I'd combine the two.
First the decorating technique. I found this video of Julia Usher on YouTube making what she calls chocolate lace. She does doilies and then a cake wrap using this technique. The video is for the cake wrap. Anyway, she makes a pattern on either parchment paper or food grade acetate using melted semi-sweet chocolate. Then she melts white chocolate and tints it different colors and fills in the areas making flowers or leaves. Once the chocolate cools and hardens a little, the wrap is then place around the sides of the cake then placed into the refrigerator to thoroughly harden up. Once that happens the wrap can be taken off the chocolate and the lace is now decorating the sides of the cake with the colored images are visible. I'll post my decorating efforts in another post.
Secondly, the recipe I want to try is called a Hummingbird Cake, which I found on Southern Living. Apparently, this is the one dessert recipe that is the most frequently asked for according to the SL website. It sounds pretty good and it definitely seems like something my parents would enjoy.
So, that's my plan. Make a small 3 tiered cake and make one tier a Hummingbird cake and decorate the cake sides with chocolate lace. I will have to modify the icing. Hummingbird Cake is usually frosted with a cream cheese icing but that won't set up enough for chocolate lace. So I'm going to use cream cheese icing for the inside and an Italian buttercream for the outside so it hardens nicely.
So that means I need a practice run. After all, I have no idea what this cake taste like and I never just make an unknown recipe on the day I need it.
I got all my dry ingredients together first. Then I chopped the nuts and 2 really ripe bananas and got the wet ingredients last.

The hummingbird cake was really easy to put together. I followed the recipe exactly and I was carefully not to over mix the batter.
It is a very dense, moist cake very similar to a carrot cake but with less spices. Some recipe versions call for coconut but the version I used did not.
The recipe calls for 3 - 9" pans but I only used 2 and my layers around about 1.5-2" thick. This cake does not rise a lot so keep that in mind.

I used a basic cream cheese frosting like the recipe calls for and it was very good. I didn't change the recipe at all but I think I would make a slight adjustment. I would add a bit more cinnamon to the batter. I used a good cinnamon too but it was just barely there. So I would use 1.5 teaspoons at least.

I don't have any pictures but for the other tiers, I'm just making a yellow cake and I'm going to fill the 10" tier with raspberry and the 6" with orange curd. The 8" will be the hummingbird cake. The recipe I used for the yellow cake is their Golden Vanilla Cake recipe. I followed their instructions and it came out perfect. It's a moist dense cake, not the fluffy crumbly kinda.
As for the chocolate lace, I watched the linked video of Julia Usher making her chocolate lace repeatedly. The hard part is determining how hot/cool you need the chocolate to be and how quickly you have get the wrap done before the chocolate sets up too much. If it hardens too much it won't bend around the cake. The only thing I can do is practice, practice, practice.

I've started by taking a long strip of parchment paper and drawing my designs in marker. Then when I flipped it over, you can see the design on the backside which I use as a guide to apply the melted chocolate. The chocolate is simply melted in a double boiler over low heat. The dark chocolate is quite fluid when its warm. You have to let it cool off a little before putting in a small paper cone or you'll burn your hand. Candy melts are a lot thicker when melted and don't flow very well so I'd stick with chocolate. Julie Usher has a video on YouTube regarding melting chocolate. Make sure you watch that before trying this.


After I got the dark chocolate down, then I melted white chocolate. Here's a tip: White chocolate will melt and get nice and fluid but if it gets too hot it will seize and thicken. White chocolate cannot take the same temperature as dark chocolate. I made a dark pink, dark green, light pink and light green. I filled in the center flower with my dark pink and the outer petals with light pink. I filled in the greens for the leaves giving it a pretty two toned look. You can see I've got some holes and maybe bubbles but that's why we practice. The bottom flower is the side that will show once wrapped around the cake. Pretty huh?

This wrap wasn't finished all the way simply because this was just a practice. But after filling in the pinks/greens I would fill in all around those vines with a light blue chocolate and cover the whole thing. Those vines dried quickly and would've just broke instead of bending so they'll have to be completely covered in chocolate. You can see where the chocolate was just popping off the parchment.
Also, there is no way for any one person to do this. The white chocolate will have to be melted, monitored, colored and bagged by someone else while I'm drawing the dark chocolate. The dark chocolate would cool off and harden if I have to do it myself. So this is definitely a 2 person job.
But I really like this technique and I think it's going to make for a very pretty 50th anniversary cake. More pics to come!
My grandmother on the other hand is a different matter. She knows my parents want nothing for their anniversary but she doesn't believe that includes having cake and ice cream. And it got me thinking...
There's been a cake decorating technique I've wanted to try and it seems like a good opportunity to try it out and there's a cake recipe that I found that I think my parents will really like. So I thought I'd combine the two.
First the decorating technique. I found this video of Julia Usher on YouTube making what she calls chocolate lace. She does doilies and then a cake wrap using this technique. The video is for the cake wrap. Anyway, she makes a pattern on either parchment paper or food grade acetate using melted semi-sweet chocolate. Then she melts white chocolate and tints it different colors and fills in the areas making flowers or leaves. Once the chocolate cools and hardens a little, the wrap is then place around the sides of the cake then placed into the refrigerator to thoroughly harden up. Once that happens the wrap can be taken off the chocolate and the lace is now decorating the sides of the cake with the colored images are visible. I'll post my decorating efforts in another post.
Secondly, the recipe I want to try is called a Hummingbird Cake, which I found on Southern Living. Apparently, this is the one dessert recipe that is the most frequently asked for according to the SL website. It sounds pretty good and it definitely seems like something my parents would enjoy.
So, that's my plan. Make a small 3 tiered cake and make one tier a Hummingbird cake and decorate the cake sides with chocolate lace. I will have to modify the icing. Hummingbird Cake is usually frosted with a cream cheese icing but that won't set up enough for chocolate lace. So I'm going to use cream cheese icing for the inside and an Italian buttercream for the outside so it hardens nicely.
So that means I need a practice run. After all, I have no idea what this cake taste like and I never just make an unknown recipe on the day I need it.
I got all my dry ingredients together first. Then I chopped the nuts and 2 really ripe bananas and got the wet ingredients last.

The hummingbird cake was really easy to put together. I followed the recipe exactly and I was carefully not to over mix the batter.
It is a very dense, moist cake very similar to a carrot cake but with less spices. Some recipe versions call for coconut but the version I used did not.
The recipe calls for 3 - 9" pans but I only used 2 and my layers around about 1.5-2" thick. This cake does not rise a lot so keep that in mind.

I used a basic cream cheese frosting like the recipe calls for and it was very good. I didn't change the recipe at all but I think I would make a slight adjustment. I would add a bit more cinnamon to the batter. I used a good cinnamon too but it was just barely there. So I would use 1.5 teaspoons at least.

I don't have any pictures but for the other tiers, I'm just making a yellow cake and I'm going to fill the 10" tier with raspberry and the 6" with orange curd. The 8" will be the hummingbird cake. The recipe I used for the yellow cake is their Golden Vanilla Cake recipe. I followed their instructions and it came out perfect. It's a moist dense cake, not the fluffy crumbly kinda.
As for the chocolate lace, I watched the linked video of Julia Usher making her chocolate lace repeatedly. The hard part is determining how hot/cool you need the chocolate to be and how quickly you have get the wrap done before the chocolate sets up too much. If it hardens too much it won't bend around the cake. The only thing I can do is practice, practice, practice.

I've started by taking a long strip of parchment paper and drawing my designs in marker. Then when I flipped it over, you can see the design on the backside which I use as a guide to apply the melted chocolate. The chocolate is simply melted in a double boiler over low heat. The dark chocolate is quite fluid when its warm. You have to let it cool off a little before putting in a small paper cone or you'll burn your hand. Candy melts are a lot thicker when melted and don't flow very well so I'd stick with chocolate. Julie Usher has a video on YouTube regarding melting chocolate. Make sure you watch that before trying this.


After I got the dark chocolate down, then I melted white chocolate. Here's a tip: White chocolate will melt and get nice and fluid but if it gets too hot it will seize and thicken. White chocolate cannot take the same temperature as dark chocolate. I made a dark pink, dark green, light pink and light green. I filled in the center flower with my dark pink and the outer petals with light pink. I filled in the greens for the leaves giving it a pretty two toned look. You can see I've got some holes and maybe bubbles but that's why we practice. The bottom flower is the side that will show once wrapped around the cake. Pretty huh?
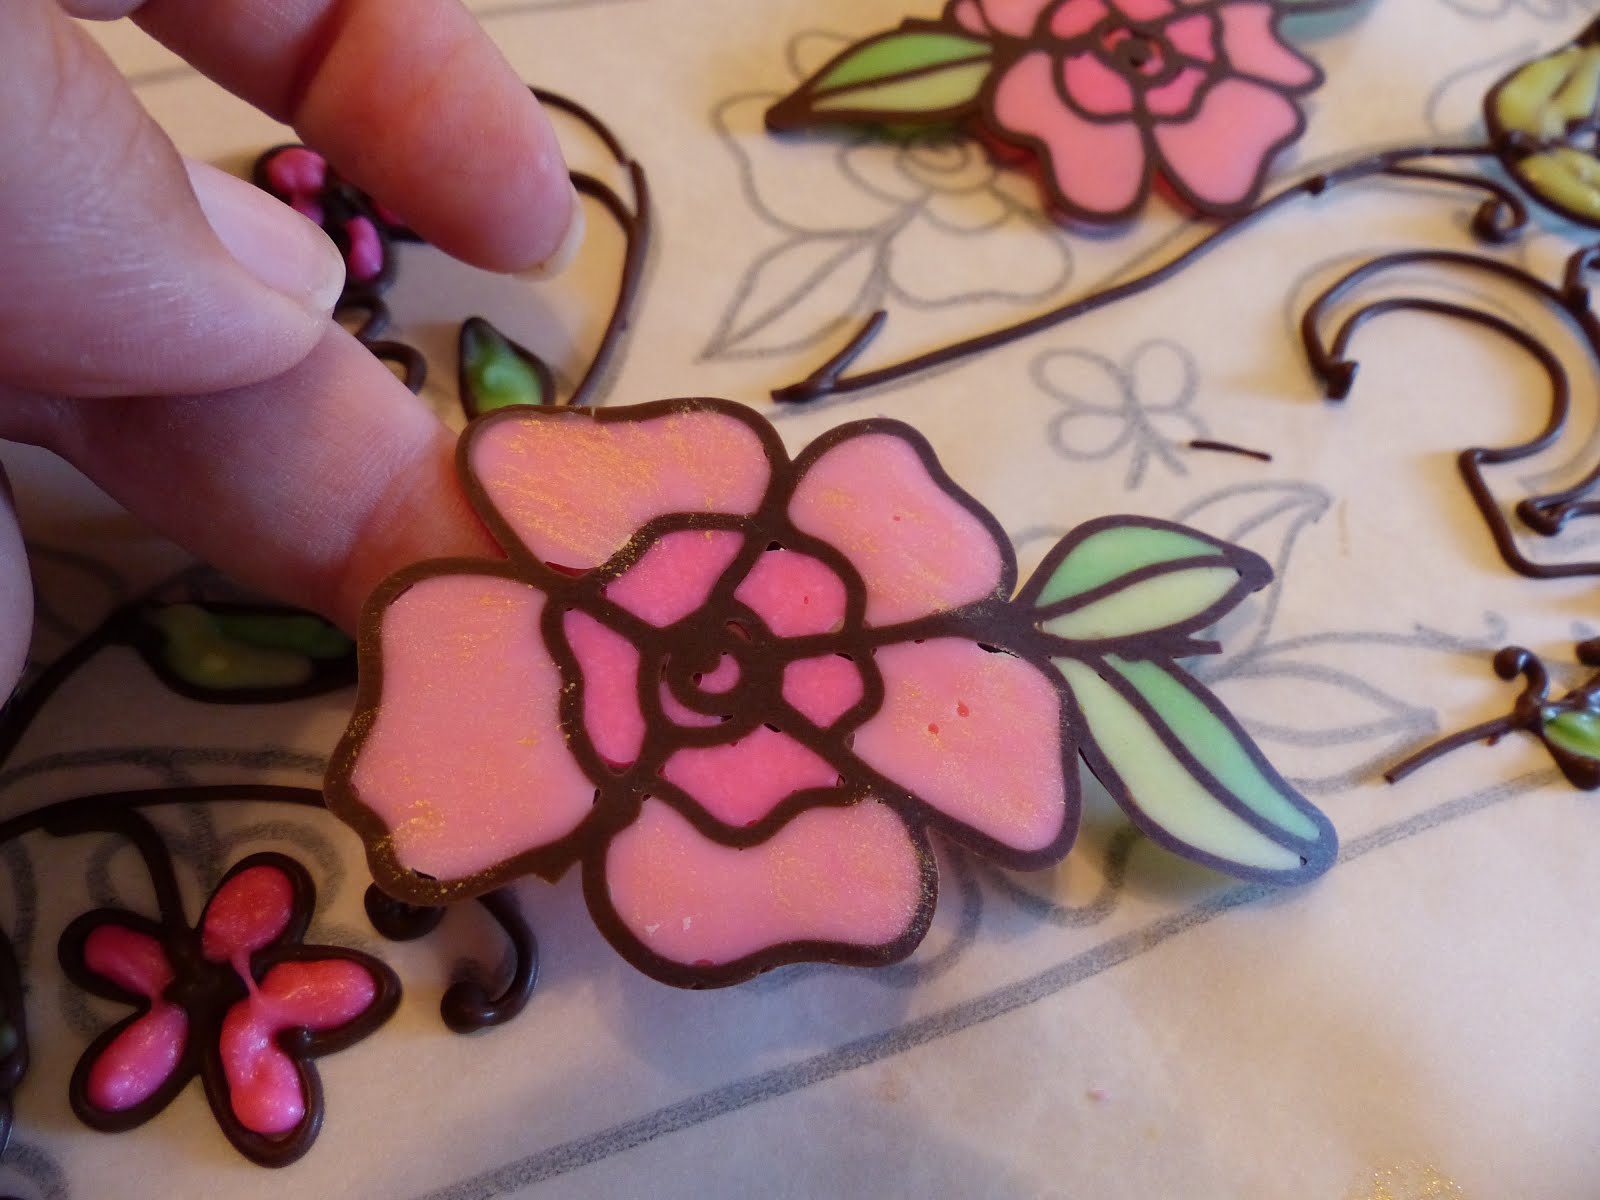
This wrap wasn't finished all the way simply because this was just a practice. But after filling in the pinks/greens I would fill in all around those vines with a light blue chocolate and cover the whole thing. Those vines dried quickly and would've just broke instead of bending so they'll have to be completely covered in chocolate. You can see where the chocolate was just popping off the parchment.
Also, there is no way for any one person to do this. The white chocolate will have to be melted, monitored, colored and bagged by someone else while I'm drawing the dark chocolate. The dark chocolate would cool off and harden if I have to do it myself. So this is definitely a 2 person job.
But I really like this technique and I think it's going to make for a very pretty 50th anniversary cake. More pics to come!
Comments
Post a Comment