
On Wander Lane - Block of the Month (May)

 Our next month in our 13 month long quilting project for On Wander Lane was for the month of May. After sewing the background fabric together (I didn't change any this month), I ironed down the pre-cut applique pieces that was sent to me in the packet. I used the block guideline to help place everything. There was some really small pieces in this one. The birds beaks and little hearts were tiny and the fabric was fraying even with the interfaced glue on the back. One of the hearts tore and I wasn't sure about trying to sew these little pieces down, so I decided to cover them with embroidery floss.


In addition to the main block, we had 3 additional blocks to make. The bird block, the flower block and the house block. 

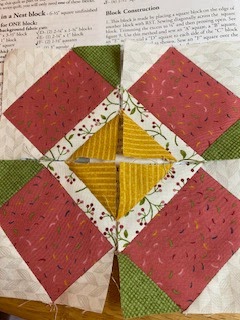
First, I cut all the separate little fabric pieces from the enclosed fabrics sent and there were a lot. It takes a while and I go slow and check everything off as I cut the pieces. Then I can follow the instructions to put everything together. The instructions have you make a lot of half square triangles or HST in quilting lingo. You do that by placing a smaller piece of fabric on the corner of another piece of fabric which is usually a different color. You can draw a line from corner to corner, like below, put the needle DOWN at the corner and sew straight across to the opposite side. You just have to make sure your sewing the diagonal correctly from the left or from the right. I have 1/4" tape on my machine (black/red/black lines) that act as a guide. You can see the end corner on the red line. If I keep that corner on the red line, I know that's where my needle will be, since the red line is directly in front of the needle. So when I sew across, I've effectively replaced the white fabric with the gold (in this case) after I iron the gold fabric over (the gold triangle on the left will flip over to the right side).


The first block I made is the bird block. As you can see in the picture below, a lot of the corners were replaced with another color using the method above. The exception was making the legs. After you sew everything together you have the finished bird block.


The next was the flower block. Using the same method, I made 4 of the block below, then sewed them all together and the effect was a flower.


The next was the house block. The center block (the house) was cut out of the fabric with all the months houses on it. And then the outer block were made using the HST method and sewn together. 


The additional blocks will be used in the final large quilt in the border so for right now, I just get to hold on to them. 


Comments

Popular posts from this blog

Jacobean Journey Quilt - Trunk Show

On Saturday, January 17, I went to my local quilt shop, Quilt Beginnings, and everyone who made either a Jacobean Journey or Feathered Star quilt last year brought in their projects. Some were finished, close to being finished or still in pieces.  Below is my quilt.  Its brown, cream, peach and a melon like color.  The blocks have been really fun to do and putting all the blocks together have definitely challenged me and some of the other ladies I spoke with. The next two pictures, are of a mother and daughter and their quilts.  They have a similar theme with black, gray, red, white and dark gold color. When asked if they were going to attempt to do the next Hoopsister's embroidery quilt "Sewn Seeds," which there's a sneak peak of at the end, they both said, "Nooooooooooo." Also, these guys say they're novice sewers but I think they've graduated! This lovely lady, did her Jacobean Journey quilt in red, pink, white and a very light blue

Jacobean Journey Quilt - Block A3H8

We finally started the applique border blocks of the Jacobean Journey quilt this month and the instructions that I was given was a little... well, confusing.  According, to Hoopsisters the instructions for several blocks are the same so they don't want to print different blocks with the same type of instructions.  So their solution was to draft the instructions using a sample of the blocks with pictures for that one block. However, additional blocks do not get their own set of pictures but share the same instructions.  For example, if a block has only 2 fabrics (say 1 and 4) you follow instructions A, which will have pictorial examples of only 1 type of block, which may or may not match the block you are currently stitching out.  So this was fairly confusing for me since my Babylock doesn't show file names just pictures and my pictures didn't match the set of instructions (or so I thought) I received since the pictures didn't match at all. So my suggestion would be

Jacobean Journey Quilt - Outer Border

I've been working on the outer border for a while now and I'm about 75% done.  Out of 44 blocks I've got around 32 done so I'm getting there. I decided not to do a video of these blocks just photos. There's a lot of fabric placement and thread changes and trying to operate a camera at the same time is just begging for something bad to happen. So I decided not to risk it. Here's the border block and corners. They are the smallest blocks I've done for this quilt. The borders are 4.5'x6" and roughly 12K stitches and the corners are 4.5" square with around 9K stitches. Outer Border Corner The outer borders require some accurate piecing first.  The first piece for the corner is strips of fabrics 1 and 4. The second strip is made from fabrics 3, 1 and 4. In the top photo of the square, strip 1 is the white, brown, white and strip 2 is pink, white and brown. To make the square, stitch out your placement area. Then place strip 1, right si