A lot of people are intimidated by gravy but you don't have to be. Once you do it, you'll see how easy it can be. Two things you MUST have when making a really good gravy is stock and brown bits. So in order to get ready for our gravy we need to make stock.
Yes, you can buy turkey or chicken stock to make this and you can even start with turkey stock from the store or start with water. Either one is fine but the stock you make at home will be 10x more flavorful then the store bought stock. And that's what you want - flavor.
So in my stock, I'm going to start with turkey stock bought at the store instead of water. I figure the more layers of flavor I can add to the stock the merrier. The purchased turkey stock (pictured below) was a nice dark color, which I was pretty happy with. You can use this as is or reduce it further to concentrate the flavor but I'm going to add more meat and vegetables.

I bought 4 turkey legs and 4 thighs for my stock but I also had in my freezer 3 chicken carcasses (2 uncooked and 1 from a store bought roasted chicken) along with some wings. I started by lightly coating the raw poultry in some olive oil then I sprinkled them with salt, pepper and sage and I put all the parts onto a cookie sheet and roasted them at 450 for 45min. - to 1 hour.
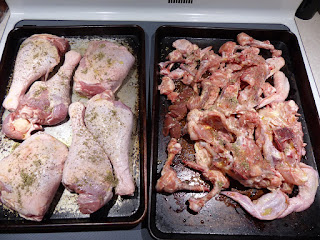
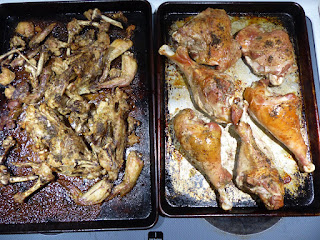
I got a lot of brown bits on the cookie sheet. Do not throw out the brown bits. That's flavor and that my friend is what makes gravy. Deglaze the pan with a bit of white wine or even water will work and scrape those bits into a bowl.

Next, in a large stock pot, saute the onion, carrot, leeks and celery until the onion is starting to brown. Add your roasted poultry and add enough liquid (purchased stock and/or water) until it covers the whole thing by an inch or so. You can use a lot of different vegetables and even herbs if you want to but for this stock, I went with just the basic veg and meat.

Now, simmer the stock. Do not boil. Simmer the stock and don't stir it for about 3 hours. During the 3 hours you can skim any fat that comes to the top and use that fat when you make the gravy. After the 3 hours is up, you can drain off the stock and start the process again starting with cold water. Take the meat off the turkey legs/thighs that you roasted earlier and pop those bones back into the stock pot. In the picture below, you can see that the stock reduced around 2 inches from where it started.

The second batch of stock may look really cloudy but that's okay. It probably won't be as dark as the first batch of stock but it will still have good flavor.
Once your stock is cooled let it sit overnight in the refrigerator. The fat will rise to the top and you can skim that off and use the fat to start the roux for your gravy. The stock will now look and shake like brown turkey flavored jello. It may look scary and weird but that's what it's supposed to do. The gelatin in the bones sets the stock up like... well jello. Below is a picture of the stock after 3 hours of simmering with the fat layer at the top.

Comments
Post a Comment