For my in-law's, 50th Wedding Anniversary is over. I decided to bake the cake myself and I'll probably get in over my head but no matter! I can bake cake but decorate? Not so well. But since I didn't want to pay several hundred dollars for a cake, I've decided to make it myself. I have another post on just the cake if your interested.
I found a product called "Cake Lace" by Claire Bowman. You can find it on Amazon, Global Sugar Art or even Etsy. I bought the pre-mixed Gold color off of Etsy because it came from AZ. Global Sugar Art was sold out and I think Amazon ships from the UK. This is a product from UK so you might want to allow several MONTHS to get it. I was going to order the Soft Gold color for the cake but when I went to order it, it wouldn't have gotten here in time and yes this was Mid July for a party Sept 12. I could've paid the $50 to expedite it but I already have quite a lot in the materials I have and I guess I just didn't care that much. So if you want a particular color make sure you get it months in advance. I think the soft gold may only be sold in the UK but I'm not sure. I also discovered you can buy the lace pre-made off of Etsy as well if you want to skip the entire process.

This is a simple product that's pretty much idiot proof to decorate a cake. You can use any silicon mat product you like. I bought one called Serenity from GSA. I thought it was really pretty and elegant looking for a 50th anniversary party. Some of the mats will run you about $54 so they're not cheap, especially if you're just trying to decorate a cake for one occasion but it if you're into decorating a lot of cakes and the mats will be used a lot its a good value. The mat is really thin and floppy but transferring the mat to a cookie sheet after I've applied the cake lace has been fine. Just don't stick a finger in your design and your okay.
A little bit goes a long way, fortunately. I get a large scoop out, spread it over the mat, swiping from different angles to get the lace into the intricate designs. When your design looks filled, look at from different angles and levels and you will see places that are thin or not filled in well. Correct those and scrape the excess lace back into the bucket. Make sure to keep the lid on your bucket so the lace doesn't dry out.

The instructions indicate you can let it air dry for 4-6 hours or dry it in the oven at 70-80 C (or around 150-160 F for us in the States) for 10-15 min. Let cool and apply a second coat. It is difficult to get the cake lace in every, single, tiny little crevice that's in these designs. Trust me. I know. The second coat also helps it be a bit more pliable and that's good for wrapping around a cake. But if your really good at application, you may not need a second coat.
I tried the oven dry method and it seemed to work fine, but I mostly just let it air dry instead. It may depend on what kind of weather you're currently having. Its in the high 80's right now with some really high humidity temps so needless to say my A/C is on. If you're in a rush though go with the oven method.
You will need a good applicator for this stuff. Claire Bowman sells a spreading knife. Its cheap only about $12 or so but probably worth it. I didn't use this knife. I used a plaster spreader that kinda rubbery but it has a flat edge. It worked like a charm. I did try to use my off set spatula and it was horrible. Do not even try, trust me.
If you think your lace is done, you can test it by peeling back a corner of the mat. The lace should just pop right out. If you begin peeling it out and it tears easy let it dry some more.

Also a good tip, is to take a toothpick and gently remove so of the excess lace that may not of gotten scraped off. If you don't you might be able to see the lace through/around the design, which will need to be removed before putting it around your cake. Also, stretch the mat in different directions and the lace will pop free a little bit. You can also take a toothpick and gently free the lace from the tiniest areas before peeling the matt off.
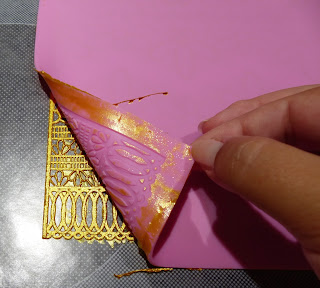
The best way to get the lace out is to flip the mat over so the design is face down on your counter. Gently, fleck a corner of the lace out and begin peeling the mat back while gently holding down the lace. Only reveal about 2 inches of lace then scoot your hand forward and continuing peeling.
Once its out you can clean up any lace that didn't come off. In the picture below, you can see the gold in between the little petal design and a sheet of thin lace down at the bottom edge. I had a lot of clean up on that one.
You can can now store it. Simply take some wax or parchment paper and make a long envelope for the lace and fold the edges so it doesn't slip out and your done. This stuff doesn't require refrigeration so you can leave out on your counter until you need it for your cake.

The lace is a little fussy. Sometimes I thought I did everything right and the lace still tore coming out of the mat so there's little I can do about it except keep trying. I did get it to come out perfect several times but most times it tore or a design was ripped off and still stuck in the mat. I doubt it will matter once I get the lace on the cake though.
Also, don't get it wet. It will melt. I just put the lace on fresh buttercream and it stuck nicely. However, I did notice the gold color bled into the white icing after it was removed. The lace was on there about 3 days. I did worry about it but there wasn't anything I could do about if it was going to bleed. Below is a picture of the 6" top tier of the cake.

Another hard part was lining up the pattern. If you need 2.4 lengths of lace to go around your 8" cake then you have to use scissors to cut out a section or you may need to cut another section off another bit of lace to make the pattern line up. You can see in the picture above the red handle of my sword pick. That marks the back of the cake where my lace may not look the best. Remember, there is always a back to a cake.
List of Tips
1) Spread the lace in several different directions over the mat to fill in all the little designs
2) Apply 2 coats
3) After it dries for several hours, gently tug the mat to stretch it a little. This will help pop the lace out of the mat.
4) Use a toothpick to try to loosen the lace from those really tight tiny areas
5) Use a toothpick to clean the raised areas around the mat to prevent a thin cover of lace in areas you want to see through
6) Flip the mat face down and gently pull the lace down, peel the mat back, hold the lace down and repeat until the lace is out of the mat.
I found a product called "Cake Lace" by Claire Bowman. You can find it on Amazon, Global Sugar Art or even Etsy. I bought the pre-mixed Gold color off of Etsy because it came from AZ. Global Sugar Art was sold out and I think Amazon ships from the UK. This is a product from UK so you might want to allow several MONTHS to get it. I was going to order the Soft Gold color for the cake but when I went to order it, it wouldn't have gotten here in time and yes this was Mid July for a party Sept 12. I could've paid the $50 to expedite it but I already have quite a lot in the materials I have and I guess I just didn't care that much. So if you want a particular color make sure you get it months in advance. I think the soft gold may only be sold in the UK but I'm not sure. I also discovered you can buy the lace pre-made off of Etsy as well if you want to skip the entire process.

This is a simple product that's pretty much idiot proof to decorate a cake. You can use any silicon mat product you like. I bought one called Serenity from GSA. I thought it was really pretty and elegant looking for a 50th anniversary party. Some of the mats will run you about $54 so they're not cheap, especially if you're just trying to decorate a cake for one occasion but it if you're into decorating a lot of cakes and the mats will be used a lot its a good value. The mat is really thin and floppy but transferring the mat to a cookie sheet after I've applied the cake lace has been fine. Just don't stick a finger in your design and your okay.
A little bit goes a long way, fortunately. I get a large scoop out, spread it over the mat, swiping from different angles to get the lace into the intricate designs. When your design looks filled, look at from different angles and levels and you will see places that are thin or not filled in well. Correct those and scrape the excess lace back into the bucket. Make sure to keep the lid on your bucket so the lace doesn't dry out.

The instructions indicate you can let it air dry for 4-6 hours or dry it in the oven at 70-80 C (or around 150-160 F for us in the States) for 10-15 min. Let cool and apply a second coat. It is difficult to get the cake lace in every, single, tiny little crevice that's in these designs. Trust me. I know. The second coat also helps it be a bit more pliable and that's good for wrapping around a cake. But if your really good at application, you may not need a second coat.
I tried the oven dry method and it seemed to work fine, but I mostly just let it air dry instead. It may depend on what kind of weather you're currently having. Its in the high 80's right now with some really high humidity temps so needless to say my A/C is on. If you're in a rush though go with the oven method.
You will need a good applicator for this stuff. Claire Bowman sells a spreading knife. Its cheap only about $12 or so but probably worth it. I didn't use this knife. I used a plaster spreader that kinda rubbery but it has a flat edge. It worked like a charm. I did try to use my off set spatula and it was horrible. Do not even try, trust me.
If you think your lace is done, you can test it by peeling back a corner of the mat. The lace should just pop right out. If you begin peeling it out and it tears easy let it dry some more.


Also a good tip, is to take a toothpick and gently remove so of the excess lace that may not of gotten scraped off. If you don't you might be able to see the lace through/around the design, which will need to be removed before putting it around your cake. Also, stretch the mat in different directions and the lace will pop free a little bit. You can also take a toothpick and gently free the lace from the tiniest areas before peeling the matt off.
The best way to get the lace out is to flip the mat over so the design is face down on your counter. Gently, fleck a corner of the lace out and begin peeling the mat back while gently holding down the lace. Only reveal about 2 inches of lace then scoot your hand forward and continuing peeling.
Once its out you can clean up any lace that didn't come off. In the picture below, you can see the gold in between the little petal design and a sheet of thin lace down at the bottom edge. I had a lot of clean up on that one.
You can can now store it. Simply take some wax or parchment paper and make a long envelope for the lace and fold the edges so it doesn't slip out and your done. This stuff doesn't require refrigeration so you can leave out on your counter until you need it for your cake.

The lace is a little fussy. Sometimes I thought I did everything right and the lace still tore coming out of the mat so there's little I can do about it except keep trying. I did get it to come out perfect several times but most times it tore or a design was ripped off and still stuck in the mat. I doubt it will matter once I get the lace on the cake though.
Also, don't get it wet. It will melt. I just put the lace on fresh buttercream and it stuck nicely. However, I did notice the gold color bled into the white icing after it was removed. The lace was on there about 3 days. I did worry about it but there wasn't anything I could do about if it was going to bleed. Below is a picture of the 6" top tier of the cake.

Another hard part was lining up the pattern. If you need 2.4 lengths of lace to go around your 8" cake then you have to use scissors to cut out a section or you may need to cut another section off another bit of lace to make the pattern line up. You can see in the picture above the red handle of my sword pick. That marks the back of the cake where my lace may not look the best. Remember, there is always a back to a cake.
List of Tips
1) Spread the lace in several different directions over the mat to fill in all the little designs
2) Apply 2 coats
3) After it dries for several hours, gently tug the mat to stretch it a little. This will help pop the lace out of the mat.
4) Use a toothpick to try to loosen the lace from those really tight tiny areas
5) Use a toothpick to clean the raised areas around the mat to prevent a thin cover of lace in areas you want to see through
6) Flip the mat face down and gently pull the lace down, peel the mat back, hold the lace down and repeat until the lace is out of the mat.
Comments
Post a Comment